This year, I was fortunate to be able to participate in the Afrotectopia Festival at Google NYC. If you haven’t heard about or attended this conference, I strongly recommend you do.


React & Mapbox
A Map Made in Heaven, Part 3
React & Mapbox | A Map Made in Heaven, Part 3
In the previous post, React & Mapbox: A Map Made in Heaven, Part 2 we walked through creating the Map Component and importing it into the App Component. This post explains how to fetch external data from the New York City Open Data website.
Fetching Open Data with axios
React relies on third party libraries to fetch data. Today, we'll be using a library called axios, a promise based HTTP client for the browser and node. Let's install the module now, create the folder and file that will contain our database logic:
$ yarn add axios
For this project build, we are going to use an API endpoint of NYC Post Office open source data.
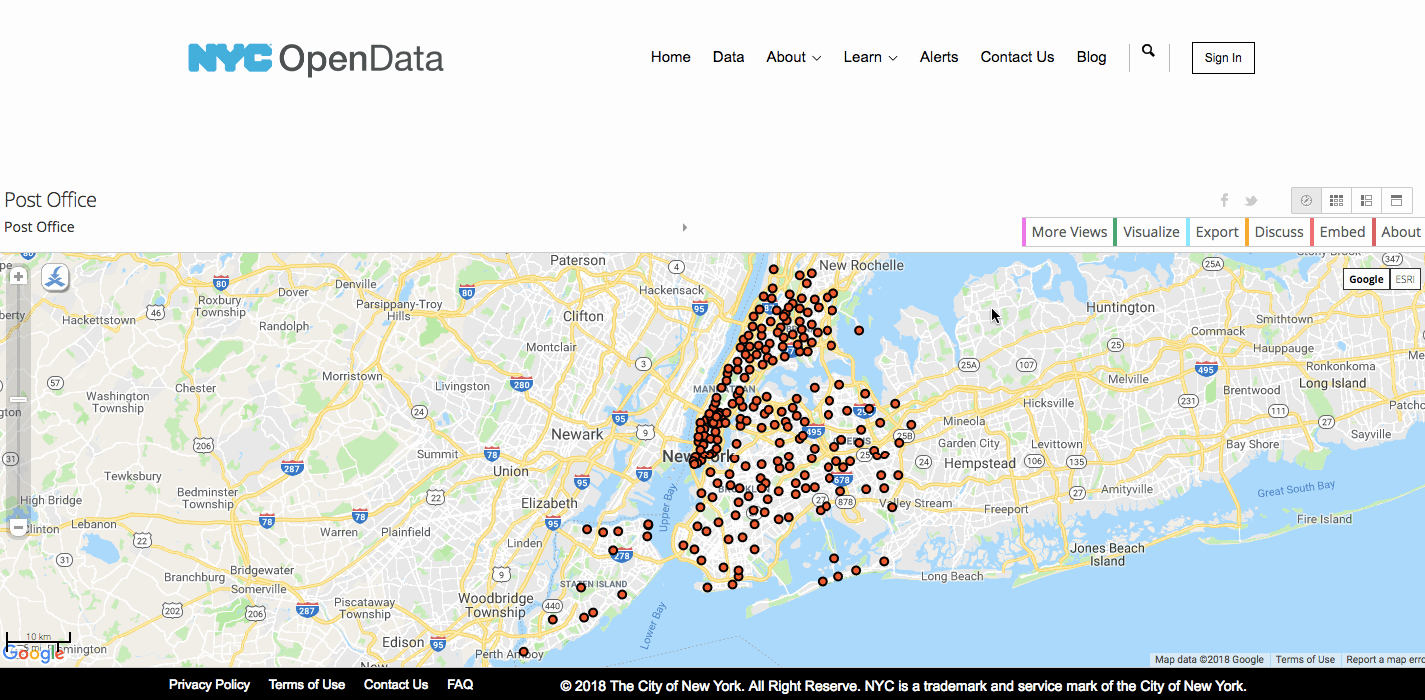
NYC Open Data
Grab the API Endpoint and look over the list of field names. These are the column names for the properties available on this dataset. The Socrata Open Data API documentation has more details on how to filter and query the incoming data.
Step 1 — Import axios
Here, we're using axios instead of the native fetch API. Install axios in the Map Component with the following:
import axios from 'axios'
Similar to fetch(), axios returns a JavaScript promise; however, now you don’t have to resolve the promise two times, because axios already returns a JSON response for you. Furthermore, when using axios you can be sure that all errors are caught in the catch() block.
Step 2 — Set the initial state to contain a property called postoffices
constructor() is basically a function that invokes when an instance of our class gets initialized. When we call super() we're basically saying invoke the same constructor function that the React library defines for their constructor. In addition to that initialize a state for this component in which buildings is a property and set its value as an empty array. We can then set the state any other time in our application using .setState().
constructor(props){ super(props) this.state = { postoffices: [], this.state = { } } }
Step 3 — Use 'getPostoffices()' to make the NYC Post Offices API call
getPostoffices(){
  // fetch API data in here
}
First, we’ll set the API endpoint to a const as a global variable in our Map Component.
In the getPostoffices(), we'll load the POST_OFFICE data. componentDidMount() is invoked immediately after a component is inserted into the DOM tree and is a good place to instantiate the network request.
const POST_OFFICE = 'https://data.cityofnewyork.us/resource/bdha-6eqy.json';

axios
  .get(POST_OFFICE, {
    // this limits the number of objects returned to 10, as per Socrata documentation
    params: {
      $limit: 10
    }
  })
  .then((response) => {
    const postoffices = response.data;
    this.setState({
      postoffice: postoffice
    });
  })
  .catch((error) => {
    console.error("Error: ", error);
  });
The response we get from the API contains an object called data and that contains other objects. The information we want is available in data.results, which is an array of objects containing the data of individual landmarks. In the promise of that request we set the state of this container component to have landmarks be the value returned from the response. Any time setState is invoked the component re-renders.
Call the getPostoffices() function inside of the componentDidMount() method:
componentDidMount() {
  this.getPostoffices();
}
Alternatively, this can all be done inside the componentDidMount(), combining the previous two steps.
React & Mapbox
A Map Made in Heaven, Part 2
React & Mapbox | A Map Made in Heaven, Part 2
In the previous post, React & Mapbox: A Map Made in Heaven, Part 1 we walked through creating a Mapbox account, creating a react application using the Facebook tool – create-react-app – and creating a simple App component. This post will walk through building out a Map component and importing it into the already existing App component.
Step 1 — Creating the Map Component
Install react-map-gl, a wrapper for Mapbox GL that was created by Uber.
In Terminal, run the following code:
$ yarn add react-map-gl
Uber has provided some boilerplate code to get us started. Let’s break down the following lines. First, we need to import React methods and the Component class from the React library. Then, import React methods from the Mapbox library; we're going to be using the Popup and Marker methods.
Next, we instantiatiate the component we're creating. In this case, it’s called Map and it’s extending the React Component class. As you know, a React component can access dynamic information in two ways: props and state. Since a component is able to decide its own state, in order to make our Map component have state, we must give it a state property and declare it inside the constructor method.
import React, {Component} from 'react';
import ReactMapGL from 'react-map-gl';

class Map extends Component {

  state = {
    viewport: {
      width: 400,
      height: 400,
      latitude: 37.7577,
      longitude: -122.4376,
      zoom: 8
    }
  };

  render() {

     const { viewport } = this.state;

    return (
      <ReactMapGL
        width={viewport.width}
        height={viewport.height}
        latitude={viewport.latitude}
        longitude={viewport.longitude}
        zoom={viewport.zoom}

        onViewportChange={(viewport) => this.setState({viewport})}
      />
    );
  }
}

export default Map;
The render method is what renders the component to the browser, so it controls what is displayed for this component. From this function, we return what we want to display. In this case, we are rendering the Mapbox map component <ReactMapGL /> and including the viewport properties.
The onViewportChange callback is fired when the user interacts with the map. User interaction and transition will not work without a valid one.
The export exposes the Map class to other files. This means that other files can import from this file in order to use the Map class.
The current mapbox-gl release requires its stylesheet be included at all times. The marker, popup and navigation components in react-map-gl also need the stylesheet to work properly. Therefore, in the public/index.hmtl file, add the Mapbox stylesheet to the head:
<!-- index.html -->
<link href='https://api.tiles.mapbox.com/mapbox-gl-js/v0.42.0/mapbox-gl.css' rel='stylesheet' />
Step 2 —Complete the ReactMapGL Component
Use the following Github repo as a guide and set the Mapbox token variable in the index.js.
const MAPBOX_TOKEN = '';
There are several ways to provide a token to your app. In this example, we're passing it as a prop to the ReactMapGL instance
Another recommended way is using the dotenv package and put your key in an untracked .env file, that will then expose it as a process.env variable, with much less leaking risks.
Put the API key in a .env file:
REACT_APP_MAPBOX_ACCESS_TOKEN='key in here'
Then, set the MAPBOX_TOKEN variable as follows:
const MAPBOX_TOKEN = process.env.REACT_APP_MAPBOX_ACCESS_TOKEN;
Interactive Map Properties
This component renders MapboxGL and provides full interactivity support. It is the default exported component from ReactMapGL and we need to set up the following properties on the map:
mapStyle: several basic templates are already provided by Mapbox here, but you can also design your own on their Studio Platform
viewport: you can specify latitude and longitude of the object that you want to define the center of your map, as well as how zoomed in on that object you want to be.
mapboxApiAccessToken: once again, it’s important to obtain your unique token to access the Mapbox API
render() { return ( <ReactMapGL mapStyle="mapbox://styles/mapbox/light-v9" onViewportChange={(viewport) => this.setState({viewport})} mapboxApiAccessToken={MAPBOX_TOKEN} /> ); }
Step 3 — Import the Map Component into the App Component
import Map from '../Map'; <div className="App"> <Map component={Map} /> </div>

React & Mapbox
A Map Made in Heaven, Part 1
React & Mapbox | A Map Made in Heaven
What is Mapbox?
Mapbox GL JS is a JavaScript library that uses WebGL to render interactive maps from vector tiles and Mapbox styles. A WebGL map brings the possibility to render vector tiles on the client side, this way we get all the data accessible on the browser and we can interact with pretty much everything on the map.
Step 1 - Create a MapBox account
If you don't already have a Mapbox account, sign up for one here.
In order to show maps from Mapbox you need to register on their website in order to retrieve an access token required by the map component, which will be used to identify you and start serving up map tiles. The service will be free until a certain level of traffic is exceeded.
Later we will use the dotenv package module to hide your environment variables (in this case, our Mapbox access token) and then we’ll put that in our .gitignore file so that hackers can’t abuse our tokens.
Step 2 - Create Directory
Create a directory to initialize the map. Here, I'm using create-react-app to create a skeleton React project. The following code creates a new directory to store the app you're about to write, then cd into the folder.
$ create-react-app my-react-map-project
or
$ npm init react-app my-react-map-project
$ cd my-react-map-project
It will create a directory called my-react-map-app inside the current folder. Inside that directory, it will generate the initial project structure:
my-react-map-app
├── README.md
├── node_modules
├── package.json
├── .gitignore
├── public
│   ├── favicon.ico
│   ├── index.html
│   └── manifest.json
└── src
    ├── App.css
    ├── App.js
    ├── App.test.js
    ├── index.css
    ├── index.js
    ├── logo.svg
    └── serviceWorker.js
Inside the package.json file, you will see several scripts have been provided that allows you to run several commands from Terminal:
yarn start. Starts the development server.
yarn build. Bundles the app into static files for production.
yarn test. Starts the test runner.
yarn eject. Removes this tool and copies build dependencies, configuration files and scripts into the app directory. Beware: If you do this, you can’t go back!

You will also see that several dependencies have been installed: react, react-dom and react-scripts. Use yarn start to start a server that will serve the React application. This opens the app at http://localhost:3000.
The browser should now display the words "Hello World!"
Now, modify the App Component to reflect the following changes in the return().
import React, { Component } from "react";
import "./style.css";

class App extends Component {
  render() {
    return (
      <div className="App">Hello World</div>
    )
  }
}

export default App;
Our environment is set up and now we're ready to develop our map component.
Visualizing Data {Earthquakes}
Using USGS data, I visualize the magnitude and location of earthquakes that have occurred on a particular day. Disclaimer: This data includes ‘quarry blasts’ and ‘explosions’ that can be easily filtered out.

All Earthquakes from one day | 09.27.2017
The first steps in this process are: create a new Processing sketch; download and clean the data; then import the cleaned data into the sketch. Pretty straightforward.
CREATE A NEW PROCESSING SKETCH
The main sketch starts with two functions: setup and draw. The setup() block runs once and is used for initializing the sketch by setting the screen size (this must be the first function inside the setup block), or applying color to the background. The draw() block runs repeatedly and is used for animation. Save the sketch as earthquake_viz.
def setup():
    size(1200, 600);

def draw():
    background(44, 62, 80)
DOWNLOAD AND CLEAN THE DATA
Download “All Earthquakes” from the “Past Day” on the USGS Earthquake Hazard Program website. It will be in csv format. Create a data folder inside the earthquake_viz sketch and save the csv as earthquakes.csv. Create a new Google Sheet and open the earthquakes.csv file. Freeze the header row and delete any rows that have empty cells in the 'mag' (earthquake magnitude) column.
IMPORT CLEANED DATA INTO SKETCH
Using Python's core library for handling csv files, include the import statement at the very top of the sketch file. Add the following with block to open the csv file.
with open("earthquakes.csv") as f:
    reader = csv.reader(f)
    header = reader.next() # Skip the header row.

    print header
Google Knowledge Graph Search
Recently, I built out a quick search widget using the Google Knowledge Graph Search Widget. The widget is a Javascript module that allows you to add topics to your input fields (I've limited mine to People) such as Movies, Places, etc. When a user starts typing, the widget finds a relevant match and it's rendered to the DOM.

In this project, I called the KGSearchWidget() passed in a configuration object, limiting the language, type (here I chose Person) and event handler for selecting an item. In the config variable, I limit the number of results in the dropdown, the language searched, the entity type I want returned and the maximum number of characters in the description of each entity.

How to Make a Simple Database Server
A couple months ago, I started writing an http server using Node.js; but had to stop because, life. I've written a few of these before, as the foundation for larger Node projects using Express for routing and MongoDB for data storage; but never used local data storage. This is the first of three posts. For the first part this program, I will be creating the database server using only what's available to me with Node.js. Before I jump into the code, a quick outline sets me up for a smooth(ish) execution:
- Create an empty Node.js project
- Install any dependencies, e.g. request
- Create the server and have it accessible from http://localhost:4000/
- Give it two routes: http://localhost:4000/set?somekey=somevalue and http://localhost:4000/get?key=somekey
- Store the key and value in local memory on the set
- Retrieve the key on the get
CREATING THE EMPTY NODE PROJECT
Create a new directory and cd into it.
mkdir simple-database
cd simple-database
npm init
This creates the package.json file to store the dependencies. Then, create the main file file that will contain the server code:
touch index.js
INSTALLING DEPENDENCIES
npm install request --save
Check the package.json file:
{
  "name": "simple-server",
  "version": "1.0.0",
  "description": "simple database server",
  "main": "index.js",
  "scripts": {
  },
  "author": "your name",
  "license": "ISC",
  "dependencies": {
    "request": "^2.79.0"
  }
}
Running these dependencies adds the node_modules folder in the root directory. Installing the request package allows you to make http requests. The --save option automatically adds the package to the package.json file and saves that version to the project in the node_modules directory.
WRITING THE SERVER CODE
The first step in creating an http server is to require the http module. http modules are included when Node is installed so no additional steps are needed to import it. Using the http module's createServer( ) method, the server is now created. The createServer( ) method takes a callback function as a parameter. Every time the server receives a new request, the callback function is executed. At this point, you can check the terminal and browser window ... each should say 'This works.' If you refresh three times, you should see 'This works' logged three times in the terminal.
The callback function takes two parameters, a request and a response. The request object contains information such as the URL, while the response object is used to return the headers and content to the user making the request.
The callback function begins by calling the res.writeHead() method which sends an HTTP status code - in this case it's 200, an indication of success - and response headers to the user making the request. If you don't specify headers, Node will send them for you. Next, the server calls the res.end() method which tells the server that the response headers have been sent and the request has been fulfilled. It can be called with no parameters, but in this case, I've included a message 'This works' as an indication that the request has been fulfilled.
The listen() method activates the server on port 4000.
var http = require('http');

http.createServer(function(req, res){
    console.log('This works.');
    res.writeHead(200, {'Content-Type': 'text/html'});
    res.end('This works.');
}).listen(4000);
To-Do List | Module Pattern
So for my first foray into using a design pattern, I'm making a Todo program using the Revealing Module Pattern. This pattern is based on the Module Pattern which I spoke about in my last blog post. The benefit of using this structure is that you can easily see the publicly available functions and variables clearly listed within the return statement.

To-Do List Mock Up
I start by assigning the module to a variable that I will then use to call the methods. In this case, I called it Todo because I'm building a Todo program. I then assigned each of the DOM elements that I would be referencing (e.g. the form, the add button and the unordered list) to variables.
This program has only one method -- it's called addListItem. Within it, I assign an event listener and pass in two parameters. The first parameter is the event, in this case I'm using submit and the second parameter is the function. In the function, I create the element (in this case it's a list item), set the attributes of the input element (for this program I am using a checkbox which later on I can make functional so that when someone checks off a task, it can disappear or the text can have a strike-through) and insert the elements into the DOM (whatever words the user types into the text input field).
Within this method, I've also included an event listener on the form which listens for when the user types in the todo item and presses enter -- in this case, I've used the submit event. I could have also used a click event on the button element.
$(document).ready(function() {

    var Todo = Todo || {};

    Todo.Item = (function(){
        'use strict';
        // assigen DOM elements to variables
        var
            _form = document.querySelector('form'),
            _inputItem = document.querySelector('.input_item'),
            _button = document.querySelector('button'),
            _ul = document.querySelector('ul');

            // set up event listeners
            var addListItem = _form.addEventListener('submit', function(event){
                event.preventDefault();

                // create elements
                var li = document.createElement('li');
                var checkbox = document.createElement('input');
                var label = document.createElement('label');

                // decorate elements
                checkbox.setAttribute('type', 'checkbox');
                checkbox.setAttribute('id', 'check');

                label.setAttribute('id', 'item_text');

                label.textContent = _inputItem.value;

                // insert elements into DOM
                _ul.appendChild(li);
                li.appendChild(checkbox);
                li.appendChild(label);
            });

        return {
            add: addListItem
        };

        Todo.Item.add();

    })();

});
Before I write any code, I tend to sketch out a short check list of steps that describes in human terms what the program will do. This one is still relatively technical, and can be outlined even simpler still.

